Introduction
Once you have the "three essential items" (hiking boots, backpack, and rainwear) that you should prioritize when starting hiking, the next thing to consider is trekking poles (stocks). With a wide range of materials and price points, many people wonder, "Which is better, carbon or aluminum?" and "What's the difference between poles in the $100 range and the $300 range?"
This article carefully explains the features of each material and price range, as well as the surprisingly little-known "common mistakes beginners make" and "how to replace and maintain consumables."
Benefits of Using Trekking Poles
Using trekking poles can provide the following benefits:
- Reduced Knee Strain: On descents, your knees bear several times your body weight, but poles can distribute some of this load.
- Propulsion on Ascents: By using your arm strength to push yourself up, you can reduce fatigue compared to using only your legs.
- Improved Balance: With more points of contact on rocky or muddy terrain, or when crossing streams, you can reduce the risk of falling.
The effect of reducing knee strain on descents is particularly significant, making them a piece of gear that beginners who "aren't confident in their stamina yet" will find especially beneficial.
Choose by Material: The Difference Between Carbon and Aluminum
The first thing to consider when choosing trekking poles is the material of the shaft.
| Material | Advantages | Disadvantages | Estimated Price Range |
|---|---|---|---|
| Carbon | Lightweight, excellent shock absorption | Weak against lateral impact; can break if subjected to strong localized force. Higher price. | Approximately $15,000 - $35,000 |
| Aluminum | Highly durable, can still be used even if slightly bent. Affordable price. | Slightly heavier than carbon | Around 12,000-19,000 yen |
In conclusion, we recommend an "aluminum" model as your first trekking pole for beginners. This is because, rather than the benefit of lightness, the durability that makes it less likely to break even with rough handling provides greater peace of mind when you are still getting used to using them. Once you feel the need to prioritize lightness, you can consider a carbon model as your second pole.
おすすめのトレッキングポール(PR)
TheFitLife トレッキングポール(アルミ製・折りたたみ・2本セット) — 初心者におすすめのアルミ製モデル
KHEALING トレッキングポール(カーボン製・超軽量115〜130g・折りたたみ) — 2本目に検討したい軽量カーボンモデル
Storage Method: Telescopic vs. Folding
There are also two types of shaft storage methods.
- Telescopic (Extendable) Type: A method where tubes are nested and slide. It is highly durable and less prone to breakage, making it suitable for your first pole.
- Folding Type: A method where the pole is folded at joints like an umbrella. It is very compact and lightweight when stored, but due to the many moving parts, the structure is somewhat delicate.
It's less likely to make a mistake if you check the feel of the locking mechanism (button type, lever type, etc.) at a store that sells mountaineering equipment before choosing.
How to Adjust the Length
One guideline for trekking pole length is height x 0.63. When purchasing, adjust the length so that your elbow bends at about a 90-degree angle when you grip the handle.
However, this length is just a standard for flat ground. Adjusting them to be slightly shorter for uphill and slightly longer for downhill will provide more effective body support. If you have telescopic poles, you can adjust them while walking, so we recommend making frequent adjustments in areas with significant changes in incline.
Common Mistakes Beginners Make
Trekking poles can be a point of failure not only in how you choose them but also in how you use them.
Buying Only One Pole
Trekking poles are basically used as a pair, allowing you to walk stably by balancing with both hands. Some people think, "I'll just try one first," but using only one hand halves the effect. If budget is a concern, it's more practical to choose a set of two aluminum models in a lower price range.
Incorrectly Threading the Strap
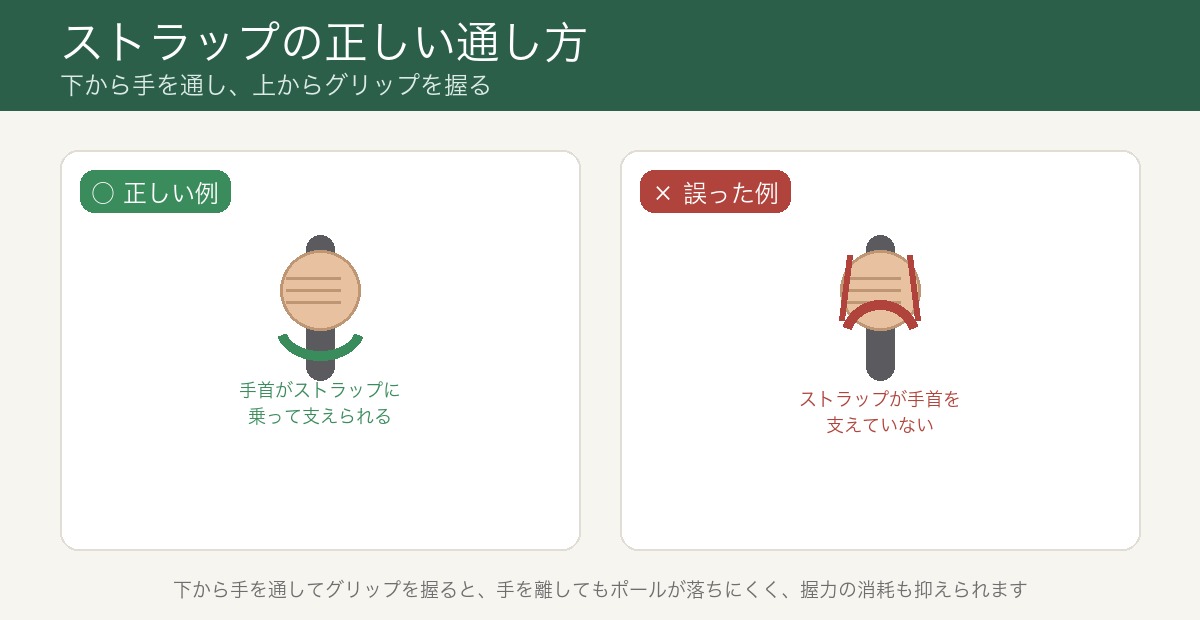
The correct way to use the strap is to insert your hand from the bottom and grip the handle from the top. This way, you can grip the pole by leaning your weight onto the strap, reducing grip fatigue. If you insert it the other way, not only will you not get this effect, but it can also be dangerous as the strap can easily get tangled around your wrist if you fall.
Applying Lateral Force to Carbon Poles
Carbon poles are strong against vertical forces, but they are weak against horizontal forces, such as when they get caught in a rock crevice and you lean on them sideways. In rocky terrain or areas with many gaps, avoid putting excessive weight on the poles. Developing the habit of lifting the pole and checking your footing before putting weight on it can prevent breakage.
Using the Same Length for Descending as for Ascending
As mentioned above, you need to adjust the downhill poles to be slightly longer than the uphill poles. If you neglect to adjust them, the poles may be too short, causing you to lean too far forward or reducing the effect of reducing stress on your knees. Make it a habit to check the length during your breaks.
Maintenance and Replacement Timing for Consumables
Trekking poles are tools that can be used for a long time by replacing consumable parts such as the following.
| Parts | Role | Replacement guide |
|---|---|---|
| Trekking tips (rubber or tip at the end of the pole) | Point of contact with the ground. Prevents slipping and reduces noise. | Replace when worn down and the metal tip is exposed. |
| Baskets (discs near the tip) | Prevents the pole from sinking too deeply into the ground. | Replace when cracks or deformation are visible. |
| Grips/Straps | The part you grip. | Replace when the surface hardens and cracks, or when the strap becomes stretched out. |
These consumable parts are often sold individually by the same brand as the poles. Purchasing them after confirming the model number at a mountaineering gear store or the manufacturer's official online store can help avoid size mismatches. Some models allow you to switch tip parts depending on the terrain, such as rubber tips for long walks on paved roads and metal tips for rocky or dirt ground. It's reassuring to check if the parts are interchangeable before purchasing.
Summary
For beginners, the key to avoiding mistakes with trekking poles is to first choose a pair of durable aluminum, telescopic poles, and to master adjusting them to your height and using the straps correctly. As you use them, consumable parts like the tips will need to be replaced, so choosing a model where parts can be purchased individually will allow you to use them for a long time.
For information on how to prepare your overall gear, please see the Guide to Necessary Items for Beginner Hikers. For other gear selection, please also see the Complete Guide to Choosing Hiking Boots, Complete Guide to Choosing a Hiking Backpack, and Complete Guide to Choosing Hiking Rainwear.