- Introduction
- What is "Mountain Grading"?
- How to Read Physical Exertion: The Concept of "Route Constant"
- How to Read Technical Difficulty: What's the Difference Between A-E?
- Considerations for Beginners Choosing Their First Peak
- Where Can I Check the Grading Table?
- Note: Grading is based on "non-snowy season and good weather" conditions.
- Summary
Introduction
Once you've gathered the necessary gear for hiking, the next question is, "So, which mountain should I actually climb?" While it's often said that "beginners should start with low mountains," the difficulty levels of low mountains vary greatly, and many people may find themselves unsure of what criteria to use for selection.
In this article, we will specifically explain how to choose your first and second peaks that match your physical strength and experience, using the official difficulty indicator called "Mountain Grading," which is published by prefectures nationwide, including Nagano Prefecture.
What is "Mountain Grading"?
Mountain Grading is a system where prefectures evaluate and publish the difficulty of each hiking route based on unified standards. Nagano Prefecture's Mountain Sports Center pioneered this in 2014 with "Shinshu Mountain Grading," and it has since spread to prefectures nationwide such as Gunma, Yamanashi, Shizuoka, and Akita.
This grading is designed to prevent mountain accidents by enabling hikers to "choose mountains that match their abilities." The evaluation axes are the following two points:
- Physical Exertion: A numerical value on a 1-10 scale, indicating how much physical strength (energy consumption) is required to traverse the route.
- Technical Difficulty: A 5-level scale from A to E, indicating the level of skill and ability required to traverse the route.
How to Read Physical Exertion: The Concept of "Route Constant"
Physical exertion is calculated based on a method called "Route Constant" devised by Professor Masayoshi Yamamoto of Kanoya Institute of Fitness and Sports. According to materials from the Nagano Prefecture Mountain Sports Center, the route constant is calculated using the following formula.
ルート定数 = 1.8 × 行動時間(時間) + 0.3 × 歩行距離(km) + 10.0 × 登りの累積標高差(km) + 0.6 × 下りの累積標高差(km)
This is the concept that multiplying this value by (body weight + luggage weight) allows you to calculate the energy consumption (kcal) required to walk that route. Nagano Prefecture's grading system uses this constant as a basis to publicly announce an easy-to-understand 1-10 level of physical exertion.
The Nagano Prefecture Mountain Sports Center's materials explain that "a route with a physical exertion level of 6 requires approximately three times the energy of a route with a physical exertion level of 2." This means that even a difference of 2-3 in the numbers significantly changes the physical burden. Furthermore, routes with a physical exertion level of 3 or below are considered "possible for a day trip" as a guideline, but with the caveat that some people may find day trips difficult.
How to Read Technical Difficulty: What's the Difference Between A-E?
Technical difficulty is divided into 5 levels, A to E, depending on the condition of the hiking trail and the required skills and abilities. Based on the materials from the Nagano Prefecture Mountain Sports Center, the guidelines are as follows:
| Difficulty | Trail Conditions | Required Skills/Abilities |
|---|---|---|
| A | Well-maintained trail | Walkable with hiking gear |
| B | Normal trail | Hiking experience / Basic map reading skills |
| C | Presence of ladders and chains | Skills to navigate ladders and chains |
| D | Unstable sections requiring handholds for balance | Balance and route-finding skills |
| E | Continuous steep rocky ridges | Advanced judgment skills (rope may be necessary for some individuals) |
The key point is that routes in higher ranks (A-E) include all the elements of the lower ranks. For example, to hike a C-rank route, you need the hiking gear required for A, the hiking experience and map reading skills required for B, and the skills to navigate ladders and chains. Additionally, C, D, and E rank routes may require strong, full-body movements, demanding higher physical fitness (approximately 8 METs of exercise tolerance) than A and B rank routes.
Considerations for Beginners Choosing Their First Peak
The Nagano Prefecture Mountain Sports Center's materials explain the following as a step-up method for beginners:
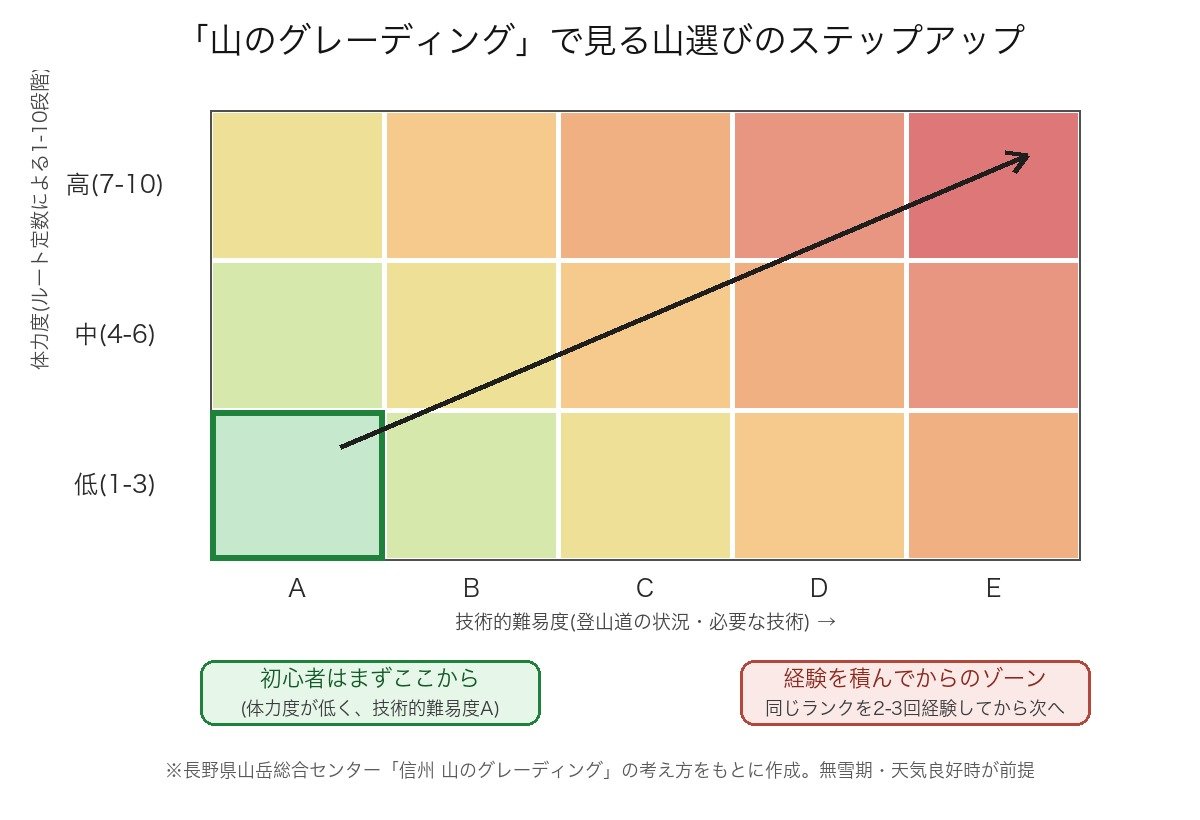
Gradually gain experience by progressing from routes in the lower left of the grading table (low physical exertion, technical difficulty A) to routes in the upper right (high physical exertion, high technical difficulty).
In other words, the basic approach is to choose your first peak from a route with low physical exertion and technical difficulty A. It is recommended not to suddenly increase the physical exertion or difficulty, even if you become accustomed to it, but rather to "experience mountains of the same rank two or three times before moving on to the next rank."
If you want to step up your physical stamina, it is recommended that you regularly train to improve your overall endurance, such as brisk walking or walking on slopes. If you want to step up the technical difficulty, it is also recommended that you climb with experienced climbers to gain experience.
As a general guideline, it is said that choosing a course that takes about 3 to 5 hours round trip for your first climb makes it easier to walk with physical and mental余裕. It is advisable to check the physical exertion and difficulty levels on the grading table and then compare it with this estimated activity time.
Where Can I Check the Grading Table?
Grading is published by prefecture, and the mountains and routes covered vary by prefecture. If you search for "(Prefecture Name) Mountain Grading" on the official website of your prefecture or the prefecture where you want to climb, you will find a list or PDF. Nagano, Gunma, Yamanashi, Shizuoka, and Akita prefectures are representative examples of published grading.
Furthermore, just because a mountain is not listed on the grading table does not mean it is dangerous. It is simply an evaluation of "accidents that tend to occur among major climbing routes," so there are many routes that are not listed. If you choose a mountain that is not on the table, please refer to guidebooks or the course time displays on climbing apps.
Note: Grading is based on "non-snowy season and good weather" conditions.
There are points to understand when using the grading system. The materials from the Nagano Prefecture Mountain Sports Center clearly state the following:
- Grading is an evaluation made under conditions of no snow and good weather, focusing only on the topographical features unique to the route.
- In actual climbing, there are risks not reflected in the grading, such as weather conditions, presence of lingering snow, physical condition, and other accidental factors.
- Therefore, many accidents occur even on mountains with low physical exertion and difficulty levels.
In other words, grading is "reference information for narrowing down candidates that match your level" and does not guarantee safety on its own. After choosing a mountain, it is important to talk to experienced climbers, check the latest conditions on guidebooks or mountain hut websites, and make plans with plenty of time for equipment and schedule. How to make these plans and establish rules for notifying others upon descent are explained in detail in the Guide to Writing a Climbing Plan (Mountain Climbing Notification).
Summary
When beginners choose their first mountain, instead of just picking a "random low mountain," a safe first step is to use the "Mountain Grading" published by each prefecture and choose a route with low physical exertion and technical difficulty rating of A. Even as you get used to it, you can step up without overexertion by experiencing the same rank two to three times before moving on to the next rank. However, remember that the grading is a guideline assuming a snow-free period and good weather, so always maintain an attitude of judging on the side of safety while observing the weather and your physical condition.
For information on how to prepare your gear, please see the Guide to Necessary Items for Beginner Hikers, and for safety measures such as rescue and getting lost, please also see the Complete Guide to Hiking Safety Measures.