Introduction
The GPS function of hiking apps is convenient, but it carries risks such as battery depletion, poor signal, and malfunctions. In such situations, the skill of "map reading" using a paper map and compass becomes your reliable tool. This article confirms why map reading is important with statistical data, and explains how to draw magnetic north lines on topographic maps and the basic use of a compass.
The #1 Cause of Accidents is "Getting Lost"
According to National Police Agency statistics, the number of mountain accidents in 2025 reached a record high of 3,623. There were 3,122 incidents, 332 deaths or missing persons, and 1,480 injuries.
Looking at the breakdown of accident causes, we see the following:
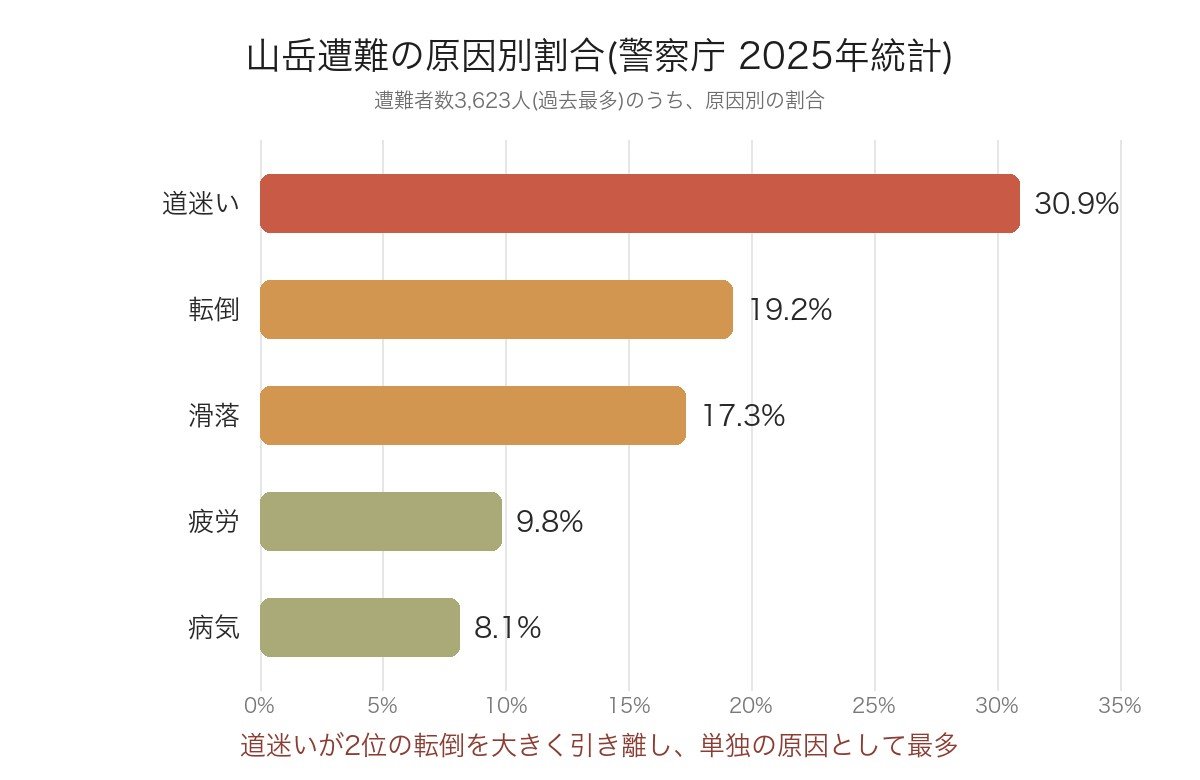
Getting lost accounts for the largest proportion at 30.9%, significantly ahead of the second leading cause, falls (19.2%). This is followed by slips (17.3%), fatigue (9.8%), and illness (8.1%). It is clear that getting lost is a disproportionately high cause compared to others. Therefore, acquiring map reading skills is one of the most effective areas for improving hiking safety.
Understanding Magnetic North Lines on Topographic Maps
The foundation of map reading is the 1:25,000 scale topographic map published by the Geospatial Information Authority of Japan. It's important to note here that the north shown on the map (True North) and the north indicated by a compass (Magnetic North) do not point in the same direction. This difference is called "magnetic declination."
The angle of magnetic declination varies by region. For example, at Cape Soya (the northernmost point of Japan), the declination is 10 degrees 20 minutes west, and at Okinotorishima (the southernmost point of Japan), it is 3 degrees 10 minutes west. Therefore, instead of memorizing a single value like "X degrees for Honshu," you must always check the "West Declination X degrees X minutes" value written in the margin of the topographic map you are using.
この角度をもとに、地図上に磁北線(磁北の方向を示す線)を書き込んでおくと、コンパスと組み合わせて使いやすくなります。2万5千分の1地形図の場合、磁北線を4cm間隔で引くと、実際の距離のちょうど1km間隔になるため、距離の目安としても分かりやすくなります。
Basic Compass Usage
磁北線を引いた地図とコンパスがあれば、次の手順で進むべき方向を確認できます。
- 地図上で現在地から目的地までを結ぶ線に、コンパスの長辺(進行線側)を合わせる
- コンパスのダイヤルを回し、ダイヤル内の導線が地図上の磁北線と平行になるようにセットする
- コンパスを地図から離し、進行線が自分の体の前にくるように持つ
- その場で体の向きを回転させ、コンパスの磁針と、ダイヤル内の導線がぴったり重なる向きを探す
- 磁針と導線が重なったとき、進行線が指す方向が目的地への進むべき方向になる
文章だけだと分かりにくい部分もあるため、実際に使う前には、経験者と一緒に練習するか、読図講習会などで実地に学んでおくと安心です。
How to Use Smartphone Map Apps and When to Use Them
スマホの登山地図アプリは、現在地表示が手軽で非常に便利です。登山計画書の書き方で紹介した「コンパスアプリ」も、スマホの機能を使った便利な手段の一つです。ただし、電池切れ・端末の故障・電波が届かない場所での不具合といったリスクもあるため、紙の地形図と実物のコンパスも必ず携行し、両方を併用できるようにしておくことをおすすめします。アプリはあくまで補助と考え、いざというときに自分の力で現在地・方角を確認できる読図の技術を身につけておくと安心です。
Summary
警察庁の2025年統計では、道迷いが遭難原因の30.9%を占め、他のどの原因よりも多くなっています。読図の基本は、地形図に記載された西偏の角度を確認して磁北線を引き、コンパスと組み合わせて現在地から目的地への方向を確認することです。スマホの地図アプリと紙の地図・コンパスを併用し、道迷いのリスクを減らしていきましょう。
安全対策全般については登山の安全対策完全ガイド、下山連絡のルール決めは登山計画書の書き方もあわせてご覧ください。